This is a continuation of the previous posts “How to start a blog that will actually make you money [Part 1], Mini-Course: How to start a blog that will actually make you money [Part 2], Mini-Course: How to start a blog that will actually make you money [Part 3] & Mini-Course: How to start a blog that will actually make you money [Part 4] in which we went over the basics of:
- Choosing and purchasing a domain name
- Securing reliable web hosting (and what hosting actually is)
- Setting up WordPress on your site
- Selecting a WordPress theme
- Selecting and installing plugins for your site
- Choosing a topic
If you haven’t read through the previous posts, please do that now, since this week we are going to dive into how to post content to your blog (step-by-step technical instructions).
How to create a post in WordPress
Now that we have all the nuts and bolts in place, we can get right into the actual content creation portion of your site.
Creating a post in WordPress is really simple.
- Login to the WordPress dashboard by going to www.yourdomain.com/wp-admin
- Click on ‘Add New’ from the ‘Posts’ menu
- You will see four main and important sections that you should fill in before publishing to your site.
- The post title (think of this as your headline)
- Post content (the guts of your article)
- Tags (these are like keywords)
- Categories (much like a table of contents or way to organize your site)
- Give your post a eye catching title – not to long but not too short, using keywords that will tie in your content
- Add your article (or other content) into the content section
- Add related tags to this post (remember these are much like keywords)
- Add the post to the category that best fits (Create a category if non yet exists – remember to keep organization and ease of use in mind).
- Publish the post by clicking the ‘Publish’ button (this will publish your post to your site)
Few tips to keep in mind
- Personally, I prefer to write or create my articles in another word publishing program such as Google Docs or Word. There are a couple of reasons for this extra step:
- Since Google Docs automatically saves your content to the cloud, you will always have a backup copy in case something happens to your server or site.
- Both Google Docs and Word give me more editing options that can then be easily copied into the WordPress content section.
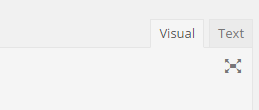
- You will notice that there are two tabs at the top of the content box – Visual & Text. For the most part you will be using the visual tab. The text tab is only used for inserting html code, such as YouTube video links or graphics that are being hosted on another site.
- If you find that you have run out of time, or just wish to come back to the post at a later time, simply click ‘Save Draft’. WordPress will save your work automatically over time, but it is always a good rule of thumb to manually click save before exiting the admin area.
- Always preview the post before publishing to make sure it looks exactly the way you want it to look. This is especially important if you have added graphics and/or pictures to your post.
- Spell check! We are human after all and all make mistakes. Also do a full proofread and fix any grammatical errors.
- Use the ‘All in all SEO’ WordPress plugin to optimize the post for search engines.
Why add images to your posts
Remember, we are living in a world where an image is easily worth a 1000 words and then some. It seems that the planet we live on is now very much drawn to all things visual.
An image can be used in a number of ways:
- To break up text on the page. Allowing the viewer to scan your article at first glance by looking at the images before taking the time to read the text.
- An image can also help to illustrate your point as well as provide SEO value to your article.
- An image (coupled with the right set of keywords and meta tags) potentially rank for even more keywords.
- It can also be auto-thumbnailed in search results therefore showing up when shared on Facebook and other social media sites.
How to add images to your posts
WordPress makes this process seriously drop dead easy. Of course, you can always do it the old school way – if you are savy with code and such. However, for the purpose of this tutorial, I’m going to go over how to add them the easy way.
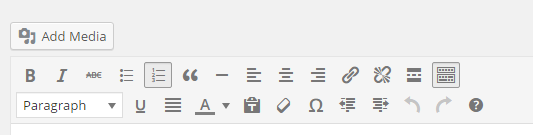
Step 1) Click the Add Media button at the top of the content box.
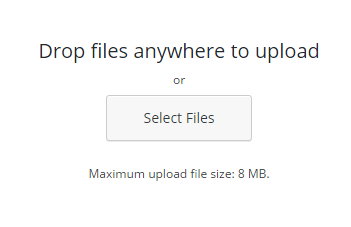
Step 2) Click the Upload Files tab.

Step 3) Either click the Select Files button to browse your computer for the image (s) that you wish to upload OR simple drag your desired image (s) to the empty box that says “Drop files anywhere to upload”
You will then see the progress meter, letting you know the uploading progress. When the image has finished uploading it will appear as a thumbnail in the media library.
From there you can choose to Edit Image which will allow you to perform basic cropping, image rotation/mirroring and sizing.
Step 4) Give your image a Title, Caption, and Alt Text which will help add some potential SEO value.
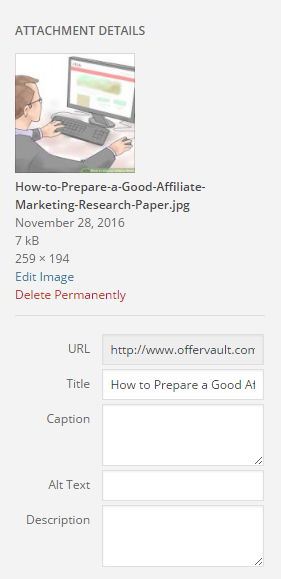
Step 5) Pick an alignment – center, left or right – or simply leave it as None which will default to left alignment to your post.
Whala you are done!
Image Sources
A few things to keep in mind when posting images to your blog/site.
- If they are copyrighted or assumed copyrighted it is best to either not use them or first get permission.
- Always cite the source of the image.
Good inexpensive stock images sites (sites that grant you full rights to use the photos):
- Photodune (about $1 per small image)
- MorgueFile
- Shutterstock (a little more expensive but still a good value)
And of course you could always create your own images by taking pictures with a digital camera or smartphone.
Stay tuned for the next installment of this mini-course. It will cover tips for writing your blog posts faster and more effectively.
Are you finding this tutorial helpful? If so, please let us now in the comments below and feel free to share with your friends!

